Sunday, December 27, 2015

Sunsets, a Poncho and Slippers With a No Stick Bottom

 
One of the things that I have learn to appreciate and enjoy living in Texas, is our sunsets. They have wonderful colors and are always different. The camera doesn't always do them justice, when I try to take pictures. Here is one that did come out looking great, imho.
 
It was taken after some storms had come through and I was standing on my back deck. At the bottom center, you can see a bit of the pond that is down the hill behind our home.


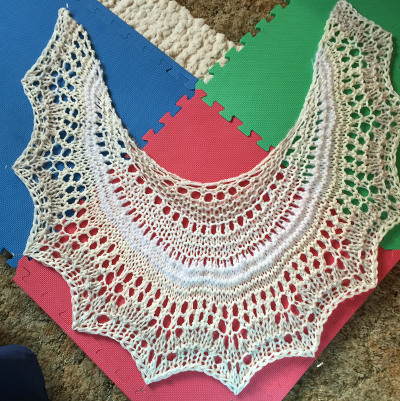
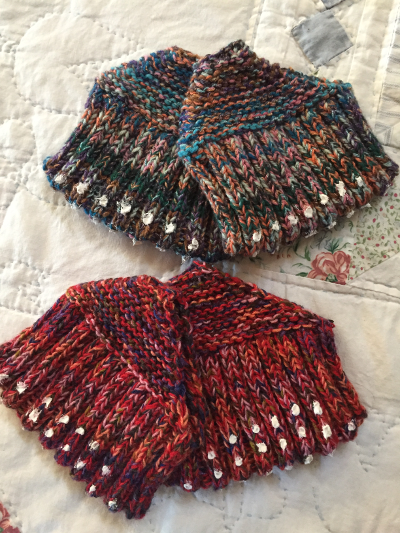
When I was visiting my mom, in September, she asked me to make a poncho wrap for her neighbor for Christmas.  They usually have tea and breakfast together on Christmas morning.  Mom wanted to give Doris something that would keep her warm when sitting and watching TV.  We talked about what she envisioned and then went to the yarn shop. I came home loaded with Ella Rae Chunky Superwash yarn, distributed by KFI. When touching the yarn, I thought it a bit rough, but I suspected it would soften when washed and I was right, it became a nice soft yarn. I actually purchased enough for two poncho's, without my mom knowing. One is this lavender color for Doris and the second was a deep red for mom. I am in the middle of writing the pattern.  I am happy to say that they both like their ponchos!

 
Another project for Christmas was a couple of pair for Salomas Slippers, here's the link to the free pattern on Ravelry. The pattern calls for worsted weight yarn or 2 strands of sock weight yarn.  My opinion is of such that you need 3 strands of sock weight to equal worsted weight, so that is what I used.  I am trying to use stash yarn as much as possible and I have bunches of sock yarn. I made these slippers for my SIL.

 
Here I am modeling one of the slippers.  :)

 
I love these slippers.  The ribbing section is knit in the round and then the garter stitch section(the part over the top of the foot) is knit back and forth in rows.  They are fun to knit!
 
I had read on another blog a couple of years ago, about putting the caulking on the bottom of slippers for a no skid sole.  I had done that and it worked really well. I had covered the entire bottom of a pair of felted slippers and wore them outside. The felt has given out in a couple of places, but that caulking is hanging on for dear life!  I had even bought my own caulking gun for the project.
 
But, exciting news!!! We don't need to use that caulking gun any more. They now sell the caulking in toothpaste like tubes at Home Depot. Buy the cheap stuff, the stuff that is acrylic and latex based. The silicone stuff, rubs off the slipper after a bit. I did try it on another pair of slippers. But, the acrylic/latex doesn't wear off. In my Home Depot I can only find the color white. No clear, so you will see the little dots. :)
 
 
The tube is super easy to use. Pull off that little cap, then cut the tip of the point and squeeze the tube, simple. Have paper towels handy and a tool, like a nail or popsicle stick, in case you need to touch the caulk. The acrylic/latex, doesn't want to come off of your hands or any other items either. It isn't water soluble. I learned the hard way! Hahaha!
 
Here is the bottom of the first Salomas slipper.

 
Here are both pairs done.  I put one less row on the aqua pair.


I didn't want to leave the guys in the family out. So, several of them received man sized slipper socks! I used the New Cottage Socks pattern from Lion Brand, here's the link. Instead of using their stitch pattern, I used a k1 p1 ribbing for the sock.  The pattern uses 212 yards of  Lion Brand Wool-Ease Thick and Quick for a pair.
 
I put the caulking on them too.


Sunday, November 1, 2015

Christmas Knitting and Pumpkin Cake Recipe

I have lots of ladies in my life, who I love to knit for. One of  those family members will be receiving this hat and hand warmer set.  For the hat I used the Spiralini pattern on Ravelry. It was a fun pattern.


I had purchased two skeins of Vanna's Choice yarn from Lion Brand yarns.  The hat was made from one of those skeins and then I decided to use my own pattern, Peek-a-boo Cable Mitts, for the hand warmers. In my pattern I use a special bind-off, but decided not to work that bind off, but to work a couple of rows of k2,p2, ribbing and then work a normal bind off.


When I was growing up, my mom would make this wonderful pumpkin cake recipe.  It was sooo good and I have great memories of this cake. I was wanting to make a pumpkin cake last week. As I was looking on Pinterest for different recipes, I thought about this cake. The cakes I kept findin used a boxed cake mix and I wanted something from scratch.  So, I went on the hunt for mom's recipe. 

I found the recipe in my recipe file, and decided to make it.  Instead of the tube pan called for, I used a regular bundt cake pan, cause I don't have the pan that she used to use.  Her pan was similar to a springform pan, with a tube in the center of the bottom part, forming a hole in the middle of the cake. You wouldn't turn the cake upside down to remove it, you would take the side of the pan off, and then lift the cake off of the bottom and place the cake on your plate.

I have looked for a pan like that, but I guess when the bundt pan became popular, maybe they stopped making the one I saw mom using. Recently, I found something similar at Ikea, but its not the same.  All that to say, that the cake didn't raise and fill the bundt pan I used, because it really needed a smaller pan. But, all in all, it worked and looked pretty and disappeared quickly.


The cake has an intense flavor of spices and is very moist.


Ruth's Pumpkin Cake
1 1/2 cups sugar
1/2 tsp baking powder
1 tsp baking soda
3/4 tsp salt
1 2/3 cups flour
1/2 tsp ground cloves
1/2 tsp cinnamon
1/2 tsp nutmeg
1/2 tsp allspice
2 eggs, lightly beaten
1/2 cup oil
2 cups pumpkin
1/2 cup water
3/4 cup raisins(optional)
1 1/4 cups chopped nuts

-Place the sugar, baking powder, baking soda, salt, flour, cloves, cinnamon, nutmeg and allspice in a bowl.
-Stir in the eggs, oil, pumpkin, and water, mix well.
-Stir in the raisins(I don't use raisins) and nuts.
-Spoon into a greased 10 inch tube pan(I used the bundt pan) and bake. 1 3/4 to 2 hours, or until done. Cool for 30 minutes and turn out onto plate. (my cake took about 1 1/2 hours, I tested it with a toothpick and it came out clean)

You can frost this with cream cheese icing, but I decided to just sprinkle powdered sugar on top.

I hope you enjoy this cake recipe and make it lots of times!

Family

Time flies when you are having fun. I heard that somewhere. Haha! I think it is an extremely true statement though.  I have no idea where the last 15 years has gone.  Here are some pictures of my oldest 2 grandchildren. Nicole is already learning to drive a car!!!
 
 
Here she is at school. Frequently, she has to dress for school as if she is going to business. Here she is on one of those days. Her mom met her for lunch and was able to get this great shot.

 
Claire picked out new glasses this summer and here she is! Always ready with a beautiful and cheery smile.

 
Here is a recent picture of my mom. I was able to visit her in NY during September.  It is always fun to visit her!

 
The granddog came to visit for a couple of days.  She loves being outside, but I don't have a fenced yard.  So, we generally go on plenty of walks and sit on the front porch.  On this day I was cleaning off the front porch and she was bird and squirrel watching.

 
Here's me!  While at mom's I was updating and cleaning her computer and while waiting I decided to take a selfie.  It was about 90 F that day and no air conditioning(and I was still smiling).


Tuesday, October 20, 2015

Chix Packin Stix Retreat

It was a hot 106 degree Fahrenheit day in northern Texas on this sunny day in August. It was the day I went on a crafting retreat, held in Gainesville, TX and located at a wonderful campground. One of the fun things for me, was to see the Texas cowboy them throughout the facility.
 
Here is our hotel. Clean and neat with comfortable beds!
 
Here is the view from the porch. This let's you see the typical Texas country view. Can you feel the heat?
 
Every guest room door had a sign of a famous cowboy. I stayed in Gary Cooper's room.

 
The western them was even carried into the public meeting room's bathroom.  This is the light switch cover in the Ladies room. :)

 
 When entering the building from the side door, you are greated with John Wayne. At least we think the statue is John Wayne.  He did protect us and was nice enough to let JoJo sit on his rifle.

 
One of the projects we worked on at the retreat, was a charity blanket. Each person was asked to bring a piece of fleece fabric for a blanket and then crochet an edging onto it. Here is mine. It is for a children's hospital in Dallas, and I decided that there are older children in the hospital who may not was a Minion blanket, so I used a plaid.

 
We had classes and they were all so much fun!  This is Astrid's hooked rug project. Astrid taught us about traditional rug hooking and how to do it.
 
We received supplies for drawing our own design and to start hooking.  After much thought, I drew a sheep. :) I still love folk art and I still love sheep, even after all these years.  I did start my rug, as you can see, but decided to finish it at home, with the wool strips and yarns that I have here.

 
We learned pine needle basket weaving too. Here is my little basket. It is about 4 inches in diameter and 1 inch tall. The center is a walnut. I did finish the basket!


All during the weekend, Sara, would put on her feathery hat and the room would hush. Imagine, 50 women hushing. :) Yes, we did.  Because Sara would call out names for door prizes. Everyone received a door prize to take home.
 
 
We also had a class on making shawl pins. We shaped the wire and then hammered the design. Hammering the wire caused it to set in place as a hard design, so it will hold its shape! Wonderful. We made the posts in the same way and then used a fine sandpaper to sharpen and smooth the end of the post.


I had a great time, meeting new friends and visiting with long time friends at this retreat. The atmosphere was very relaxing and the food was great too!  I have put my deposit down to attend the next one, in March 2016.

Sunday, October 11, 2015

Shawls and More Shawls

Fall is here and summer is over. In north central Texas that means that the 100 degree temperatures are gone and most of the days are now even lower than 90 degrees.  We may occasionally have a 90 degree day, but most are in the 80's. It is amazing how cool 80+ degrees or even 90 feels, after 106. 
 
During this summer I spent a lot of time making shawls. Seems that a lot has gone on in my friends' lives calling for a couple of prayer shawls to be made.
 
This shawl is one of the prayer shawls. It was actually for a friends' sister.
 
Here it is pinned out and blocking, the light for this picture is better, than the other pictures, it was daylight. The other pictures were taken before the sun came up, so it was dark in my front hallway.
 
 Here is the back. The shawl was made out of different yarns that I had on hand. Different textures add an artsy look.

 
 This shawl is made from handspun yarns. I had never used this shaping technique and was really happy with the outcome. Sorry, there isn't a close up picture of this one.
 
Now, onto the other shawls I made.
 
I own a small triangle shawl loom.  I have been having fun using it and then crocheting or knitting an embellishment around the edge.
 
 The next two shawls were each made using a woven triangle center. For this one below I crocheted an edging around the triangle. I used a K sized crochet hook and several different lace stitches.

 
This shawl used the same yarn for the center triangle, but different yarns for the embellishment. I  knit the embellishment for this shawl, using several different lace stitches. This shawl sold almost as fast as I finished it, so there isn't a close up picture of it.

 
I did get to go to NY last month, there will be a post on that trip in the near future, but while I was visiting my mom, my brother brought in this little newspaper picture to me. Seems there was another overgrown Merino lamb, this one is named Chris. Small print says Chris yielded 89 lbs of raw wool, an equivalent of 30 sweaters!!!  Amazing.


Sunday, July 26, 2015

Ma Cherie, Turtle and Bags from Bags

Sometimes I get so caught up in creating items, I don't slow down long enough to edit the pictures and put them on the blog. I wonder if anyone else is like that?
 
I get so excited that a project is done, that I cannot wait to start another one. Of course, there is a long line of ideas and yarn calling out my name, "Joanne, Joanne, Joanne, pick us up and knit, or crochet, we aren't picky, just make something else."   
 
Below we have several projects that are in that category. They have been finished for a while, as a matter of fact they are on etsy. But, I have never posted them on my blog.
 
Here are two Ma Cherie shawls. You know, these will work well as a scarf and work in air conditioning too. If a knitter doesn't have bulky yarn, several yarns can be put together and then held as one strand to make this pattern.  That is what I did with this black one. I had a finer black yarn and added some silver and light blue skinny yarns. Held these several strands together as one strand and made the shawl.


In the town near my home, Denton, there is a business called Scrap.  People will donate their unused craft supplies and Scrap sells them.  I do go in there, from time to time, and sometimes will find some fantastic yarns. Below is one of those yarns.  A super bulky art yarn that also works well with the Ma Cherie pattern. This yarn gives the shawl a boho look.

 
The turtle is a test knit that I did for a designer on Ravelry, here is a link to the pattern.  I loved making this little turtle.  It is actually an ice pack. Inside I put a cotton fabric bag, full of popcorn kernels.  Store the turtle in the freezer and when your little ones bump themselves, you are ready with a fun ice pack. You know, maybe I should make one for me? I still bump myself, do you?
 
The turtle can also be a tiny heating pad. I used cotton yarns for the entire turtle, stuffed the head with cotton yarn bits and used cotton fabric for the bag, that holds the popcorn, inside the body. Using all cotton and popcorn, allows us to put it in the microwave to heat. 
 
This little turtle went to live at my daughter's home to help my grandson, and now granddaughter, out when they bump themselves. 


The next project started with my 30 inch tri-loom.  Every once in a while, I will weave on it.  I made this triangle and then crocheted an edging around the triangle to make a shawl.  The yarn is from Brown Sheep and is their Cotton Fleece. This item just sold in my etsy shop.

 
Last, but definitely not least, I have a really good friend who is having a blast making bags from bags!  She is taking plastic grocery bags, cutting them in loops, connecting the loops and making yarn. Then she crochets bags. I think she has done close to 30! She stopped counting at 24. :)
 
Most of the bags have been gifted away, but she did keep a few for her own shopping and crafting use.  A few weeks ago she showed up with these. More bag yarn is in the larger one and her lunch was in the tiny one.  I love these bags and they are so much fun to make and see. 


Friday, July 3, 2015

Alligator Surprise!

Well, I have mentioned the rain before and thankfully it has slowed down some, but we are still getting an occasional rain storm.  Some of the roads near and around the lakes are still flooded in several places. In our little town, we have one major road flooded in two places and another road still flooded in one place. This makes for driving and getting out of the community pretty tricky. We now have only one road in and out.
Here is one of the flooded roads. That lime green stuff you see, is the water.  It is full of algae and really awful looking. I stayed in the car to take the picture, didn't want to meet a snake or alligator, not to mention the mosquitoes. Nope not that brave, thank you. 
 
Umm, here is why I mentioned alligators.  Normally, we don't think of north central Texas having alligators.  Well, apparently, people have been buying the babies and having them as pets. Crazy and nuts, if you ask me. Anyway, they don't want to kill them when they get too big to have as a pet, so what do they do??? They dump them in the local lake! Good grief. This is the second sighting of an alligator. The first sighting was near the place of the green water and it was only a 6 foot alligator. Haha! And since I didn't want to tempt fate AND I didn't need a new pair of boots or a bag, I stayed in the car.
 
 
KNITTING! I finished my Seabrook vest. The pattern is from Berroco and is free. I used a cotton yarn from Cascade, named Luna, for my vest. I didn't meet gauge with this yarn. But, I solved that by just casting on fewer stitches. This vest is knit sideways and is a giant rectangle.  If I had cast on the amount of stitches called for, I would've had a floor length vest.  Being only 5' 1", I am not exaggerating(much) on that comment.

So, the vest is supposed to be ALL seed stitch.  I gave up on the seed stitch after only 4 inches. You know, there can be too much of a good thing. I decided to knit every row, for the rest of the vest and finished with a seed stitch border on the opposite end.
 
Another project, that I just made is this scarf. I had to run and find the pattern just so that I could give you the correct name. Um.  Here it is. Linen Summer Wrap. This scarf is addictive. It is one of those projects that you can memorize the pattern and just knit. You knit it sideways and increase to a certain stitch count, then start to decrease. Every so often you throw in a row of extra yarn overs for each stitch and the next row you drop those yarn overs, so that you have a lacey look.  It looks great when done and is a wonderful accessory to your outfit! I have just started my 4th one. No gauge worries either! You just want it to be a drapey fabric. It takes about 160 yards of yarn.

Yarn for this scarf is Linen Concerto, from Plymouth yarns.

Sunday, June 14, 2015

Upcycled Quilt Tote, Grandchildren, Unbalanced Yarn(Nightmare Socks)

I was going through my finished project pictures and realized that I hadn't posted this little tote.  To make this tote, I used an old quilt and doilies, which were purchased at a flea market.  The bag is big enough for a small project, like a pair of socks. I made this in December, 2014 and it was part of my gift for the yarn spinners group that I attend.
 
 
We just arrived home from a trip to help care for our grandson while his little sister was born.  I had a great time playing with him and holding our new precious granddaughter.
 
Here's our 3 1/2 year old Ninja Turtle.
 
 
AND our precious 3 day old granddaughter. 

 
 One of the projects that I took along with me, to work on while flying, was a pair of red socks.  I have wanted a pair of red socks for years! I purchased the yarn from an indie dyer at DFW Fiberfest, about 2 years ago.  I am so disappointed with this yarn.  The color is great, but the quality of the spin job of this yarn is awful.  I don't know who her supplier is, but really this is awful, a real Nightmare. The yarn is not balanced.  I am not sure if I can fix it, by running through my spinning wheel, but I will probably try.  However, if you spend $20+ on sock yarn, it should be perfect or near perfect. I loved this red color.........

I cast on both socks, from the toe up, using the two at a time magic loop technique.  However, as I was knitting along, the yarn started twisting back on itself and knotting up.  Since I was pulling the yarn from the outside of the ball, I decided to rip them out and start again.  The second time I started by pulling from the center of the ball.  I soon realized this project was doomed.  BUT, still trying to salvage them, I thought what if I take off one sock and just knit one at a time? This way, I could stop every once in a while and hold the sock out and untwist it, to balance the yarn. Well, that worked for a bit, but I was having to do this about every 20 stitches.  I finally gave up and put the project in time out, where is still sits. ;)

Below is one sock toe and the ball of yarn.  All that curl and twist in the yarn is the unbalanced yarn starting to knot up on itself. Nightmare.....

 
This next picture is a close up of that toe.  If you look carefully, you will see, on the right hand side of the photo, the increases for the toe shaping.  Look at the left side? Where are the increases? We cannot see them, they are twisting around the toe. Nightmare...  There is a set of increases on that side that should be seen on the front, but cannot be seen because of the twisting.  This is what will happen with unbalanced yarn. It looks like you have knitted something on the diagonal because the fabric you are making is actually taking on the life of the uncontrolled twisty yarn.


Yes, I could keep going and block the socks.  But, truly, that shouldn't be needed.  Also, I am afraid that they will feel like they are twisting around my foot and be uncomfortable. 

So, I will meet the challenge and try to fix this yarn and make it balanced.  I like the red. :) For now, time out socks....  Haha!